

Welcome to your first ever guitar lesson.
Look – I’m sure you’re awesome at a whole bunch of other stuff – like bowling, and brewing, and… blacksmithing – but you’re brand new to guitar.
So, chill. Relax. You’re not supposed to know anything about this. And you’re kinda supposed to be bad at it.
You’re in the right place.
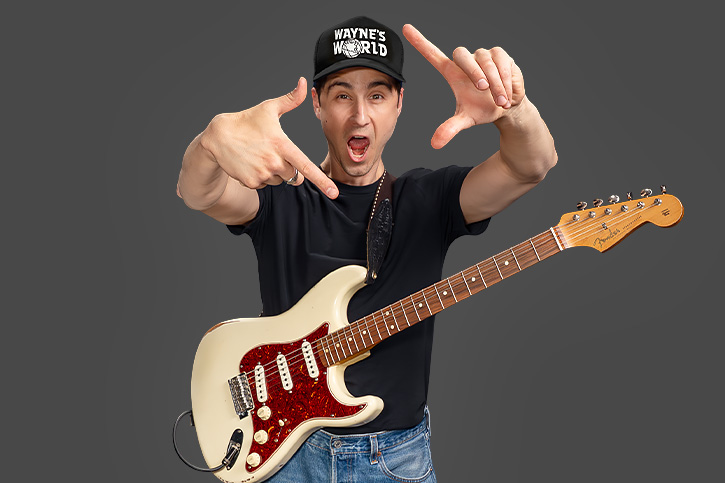
We all start knowing absolutely nothing about guitar. For me, it was when I first watched Wayne’s World 2 and fell in love with Aerosmith.
I ran to the music store wanting to just hold an electric guitar. I thought, “maybe I’ll be able to figure out how to play ‘Dream On.’”
Spoiler alert: I did not.
After 20 minutes of holding a guitar, I could pluck one note and not make it sound horrible and buzzy… about 50% of the time. And then I was asked to leave because the store was closing. It was not the triumphant start to my guitar career I was hoping for.
But maybe if I had a cool, easy to read article that showed me everything I needed to know to feel and sound good immediately, it would have gone a lot better…
Which is why I wrote you this First Ever Guitar Lesson article. In 7 simple steps, I’m gonna take you from total noob to playing your first song.
You’ll start with playing positions and gear essentials, then we’ll hit picking, fretting, and rhythm.
I may have had a rocky start in that guitar store many years ago, but it’s not too late for you.
If you’re playing ELECTRIC, we have a few things to cover before we get into playing. If you have an ACOUSTIC guitar, awesome. Scroll past steps 1 and 2 and keep reading.
#1Plugging In
We’re starting at the absolute beginning. Total noobie level. So I’m assuming you know absolutely nothing about the electric guitar.
Which brings us to step 1: how to make sound. Before we get into picking and fretting, you need to plug in your guitar to your amp with a cable.
You should practice amplified most of the time so you can hear yourself the way other people would hear you.
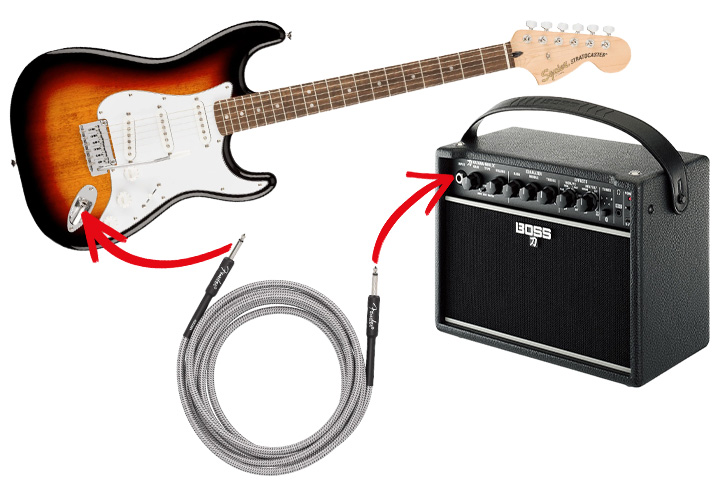
 Important note here – make sure the amplifier is PLUGGED IN, but NOT TURNED ON at this point!
Find the jack—the spot where your cable plugs in. It’s either on the top with the knobs and strings, or on the side near the strap button.
Plug the cable into your guitar. Either end works. Then take the other end and plug it into your amp. When you plug into your amp, make sure you plug into the jack that says “input,” because it might have some other jacks.
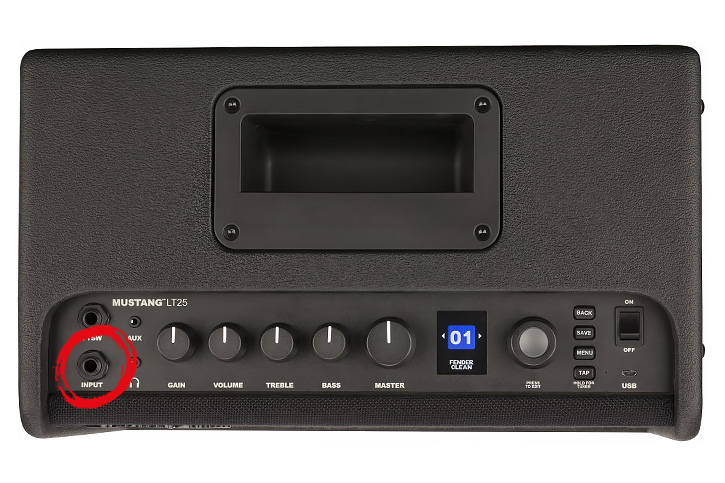
Time to turn on your amp.
Now you should hear some guitar sound out of the amp. If it sounds too loud, too quiet, or just BAD, you need to start twisting some knobs. Onto step 2.
#2Twiddle The Knobs
Between your guitar and your amp, you probably have a bunch of knobs to adjust. Some of them might have a confusing label. Like ‘master’ or ‘tone’? Why do I need more ‘master’? Why would I want less tone?
Don’t worry. I’m gonna walk you through all the ones you need to know. And if you can put gas in your car or do self-checkout at the grocery store, you can handle this no problem.
You don’t need to know what every single little knob does. You just need enough basics so you don’t sound like a fart or have the neighbors call the cops.
First – The Knobs of Your Guitar
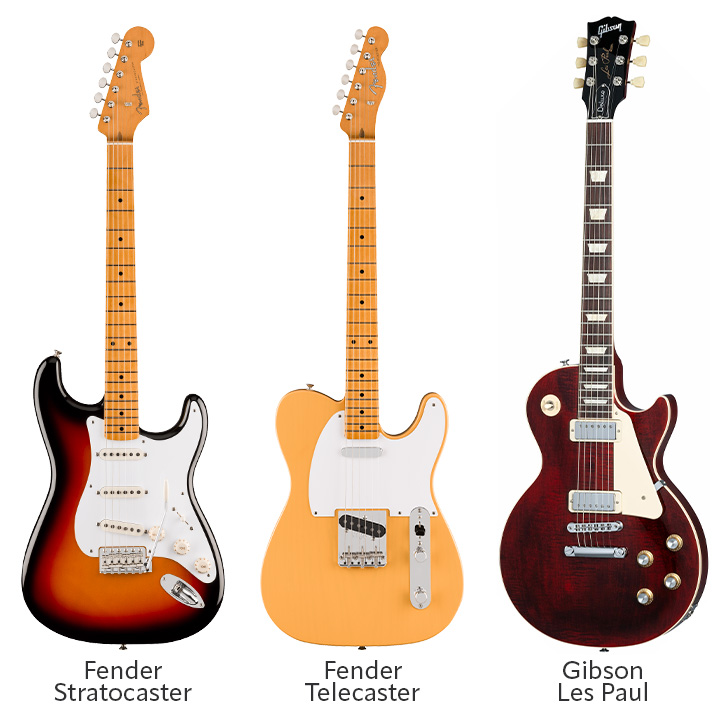
There are a lot of guitars out there—but most of them trace back to three heavy hitters: the Fender Telecaster, the Fender Stratocaster, and the Gibson Les Paul. Those are the blueprint for most guitars out there.
So I’m gonna explain the controls using those three as our guide. Even if your guitar isn’t one of them, chances are it’s close enough that everything here will still click.
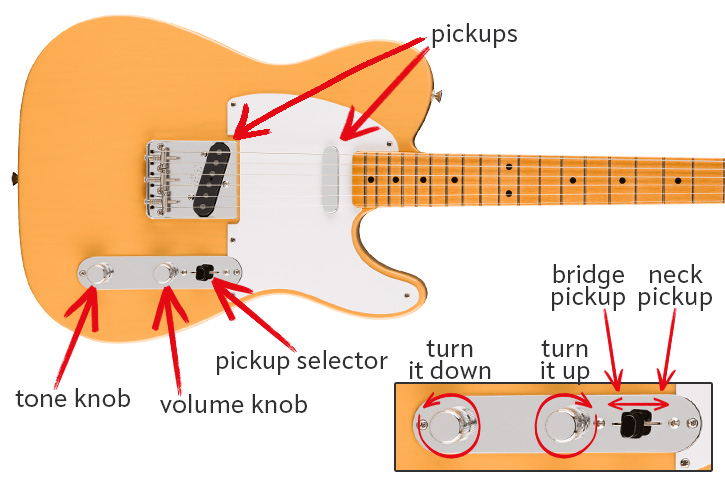
On a Tele, you have two knobs. The one closer to the neck is the volume knob. Clockwise makes it louder, and counterclockwise makes it quieter. The other knob, the one further from the neck, is the tone control. If you turn it clockwise for a brighter, chimier tone. Turn it counterclockwise for a darker, more muffled tone.
Another way to change the sound on your guitar is by using different pickups. What the heck is a pickup, you ask? A pickup is essentially the microphone on your electric guitar.
Electric guitars usually have at least two different pickups to choose from. On a telecaster for instance, there are two—one by the neck and one by the bridge. We call ‘em the neck pickup and bridge pickup respectively, and you use the selector switch to choose which pickup is activated. Pointing the selector switch towards the neck activates the neck pickup, towards the bridge activates the bridge pickup, and in the middle selects both pickups at once.
 The neck pickup has a WARM and ROUND sound, and the bridge pickup is BRIGHT and AGGRESSIVE sounding. You can also activate both pickups at once for a unique sound that is the best of both worlds.
Each pickup setting sounds awesome, but some settings work better for different styles of music. Once you start playing you can find which sound you like the best for what you’re playing, but the neck pickup is a good starting place for now.
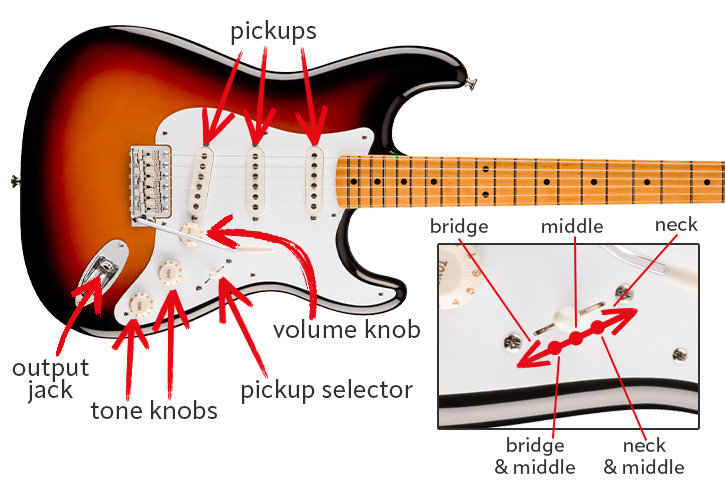
Strats have three knobs. The one that’s closest to the strings is the volume knob. Just like a Tele, clockwise makes you louder and counterclockwise makes you quieter. The other two knobs are both tone knobs. The one closer to the strings controls the neck pickup or the neck and middle pickup (yes, Stratocasters have an extra pickup!). And the one furthest from the strings usually controls the middle pickup, the bridge pickup, or the bridge and the middle pickups.
On a Strat, there are five different pickup selections. When it’s pointing towards the neck, the neck is activated. Flip it down one, and both the neck and middle pickups are in use. Flip it one more and only the middle pickup is in use. One more flip, and you’re hearing the bridge and middle pickups together. And flipped all the way down means you’re just hearing the bridge pickup.
Again, the ‘best’ position depends on what style of music you’re playing and the sound you’re going for, but the neck position is a great all-rounder starting point for beginners.
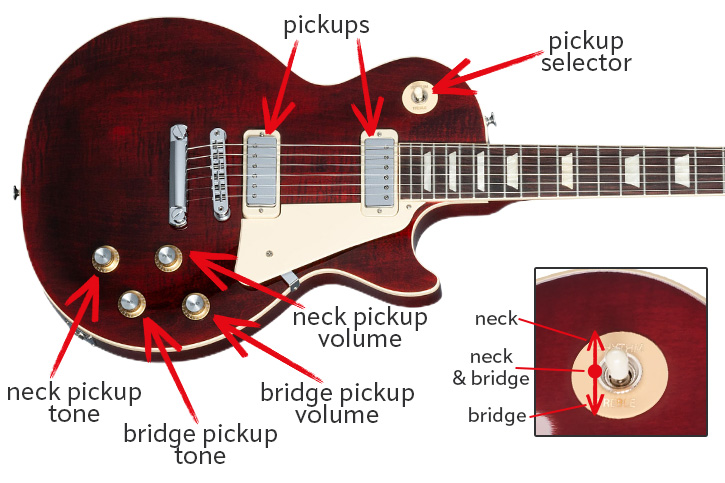
The Les Paul, and almost all Gibson style guitars, will have four knobs. The two closest to the strings are the volume (closer to the neck) and the tone (further from the neck) for the neck pickup. The two knobs that are further from the strings are the volume and tone for the bridge pickup.
A Les Paul’s pickup selector is similar to a Telecaster’s. The switch points up for the neck pickup, down for the bridge, and in the middle for both pickups. Again, the neck pickup is a good starting point for most stuff.
Second – What About Those Amp Knobs?
Every amp is a little different and will have different knobs. But the basics overlap, and there’s an easy way to get yourself in the right ballpark.
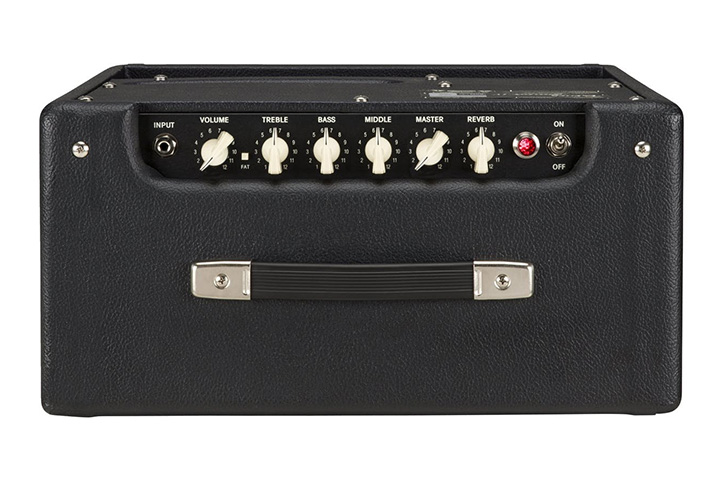
Start by setting all your knobs, except for ‘volume’ (and ‘master’ if you have one), straight up to 12 o’clock. This is the neutral setting. No weird stuff.
But unless you’d like an eviction notice, don’t do this with your volume or your master knob. Instead…
- If you have a volume knob and no master, keep the volume all the way down, then slowly bring it up to a level that won’t get the cops called.
- If you have a volume and a master, turn your master all the way down, set the volume to noon, and slowly bring the master up until you hit the eviction-free volume.
That alone should get you a solid, usable sound.
If you want to go deeper later, definitely check out your amp’s manual and mess with the knobs on both your amp and your guitar. But for now, 12 o’clock and a reasonable volume means you’re in business.
But wait – you’ve got volume knobs on your guitar AND on your amp – how do you use ‘em together?
Set your guitar’s volume all the way up (or close to it), and use the amp to control your overall volume. That’ll keep your signal strong and make sure you don’t get blasted when you turn your guitar volume up.
For The Headphones / Bluetooth / Interface Users Click Here
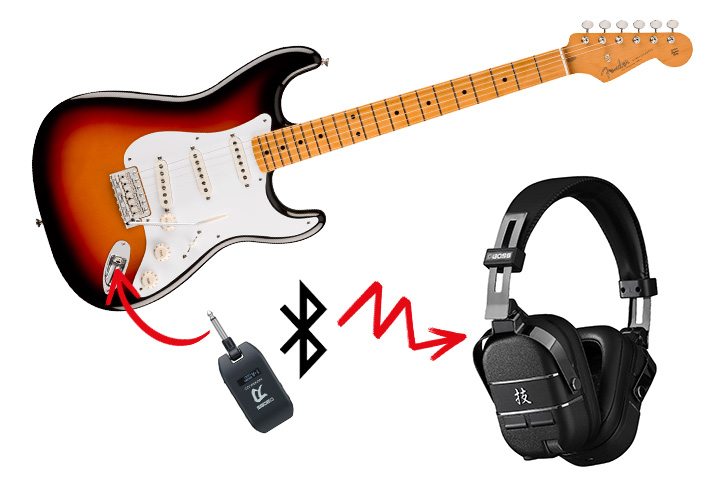
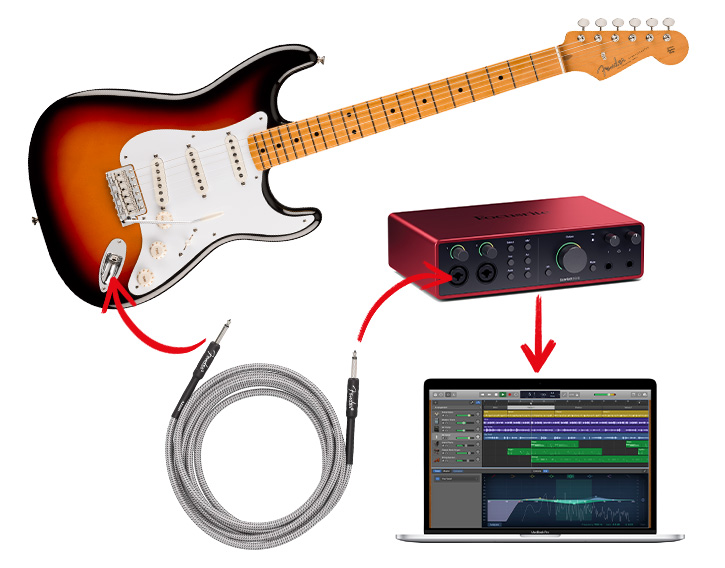
There are some killer options out there if you’re not into using an amplifier.
If your signal path is guitar > bluetooth device > headphones, cool.
If it’s guitar > audio interface > computer > headphones, that’s also cool.
But with any of these options that aren’t just turning on an amp, you’re kinda on your own. There are way too many set ups and variables for me to go through and be able to explain well in this short article.
I will just say that, even at low volume, hearing yourself out of a real amplifier is just plain sick. Feeling the air move, that little rumble in your belly, the wind in your freshly teased hair….it’s all part of your rock n roll fantasy.
But I totally understand that it’s just not possible to do all the time. I’ve lived in apartments for a lot of my adult life, and sometimes you just need a headphone rig.
Bottom line: if headphones are what you’ve got, run with it. But unfortunately, I can’t be your customer support agent, so I hope you have a good one!
So now you’re powered up, you’ve got volume, and you’ve got tone.
Before you start rippin’ your first riff, let’s get you in position.
#3Assume the Position
Playing guitar in a bad position sucks. You’ll hurt your arms, your neck, your back, and all other sorts of body parts that you never thought you would from simply playing guitar.
Lucky for you, I did this wrong myself for long enough to tell exactly you what not to do.
Tip #1
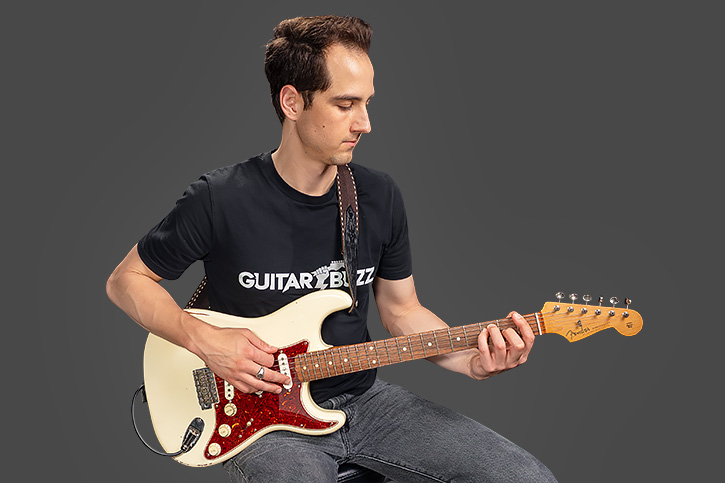
The  Sitting Position
If you’re playing while sitting, you want to have your hips higher than your knees so you don’t mess up your lower back.
Tip #2
 Guitar Position
If you’re sitting, your guitar should sit on the leg on the same side as your strumming hand. If you’re playing right-handed, this is your right leg. If you’re playing left, it’s your left leg.
- Note: You’ll often see classical style players rest the guitar on the other leg; the leg on the side of the guitar neck. This is great if you’re playing classical, but I’m not teaching you to play Für Elise today, so let’s not do that.
Tip #3
Strap  On
On
A guitar strap is super helpful even if you’re sitting, because it helps stabilize your guitar so your hands can just focus on playing.
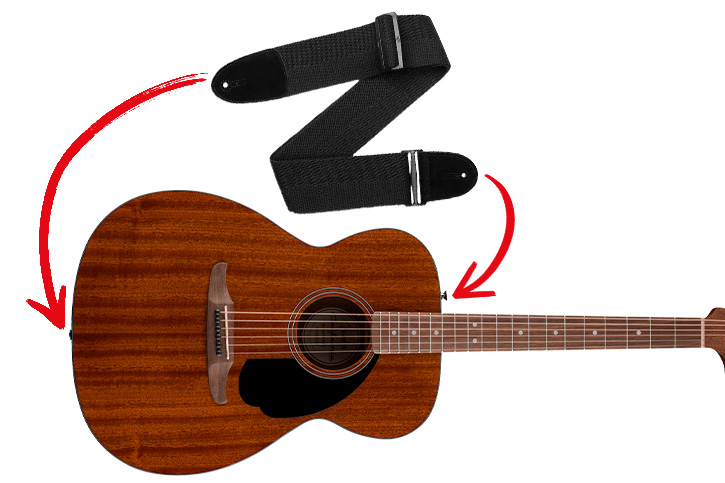
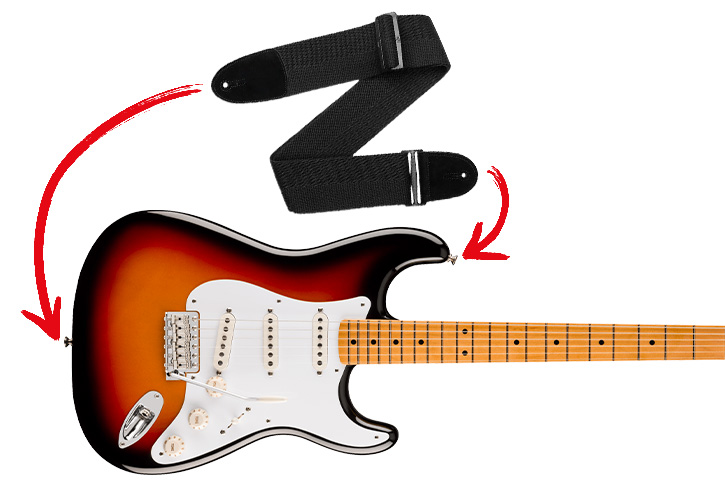
- Both acoustic and electric guitars have strap buttons. Both should have one at the end of the body. On electrics and most acoustics, there will be another strap button close to where the neck connects to the body.
- If your acoustic doesn’t appear to have a second strap button by the neck/body joint, you’ll need to tie a string around the headstock (under the strings, between the nut and the tuning pegs), and attach the other end of your strap to it.
- Put your fretting arm and head through the strap, and you’re ready to rock.
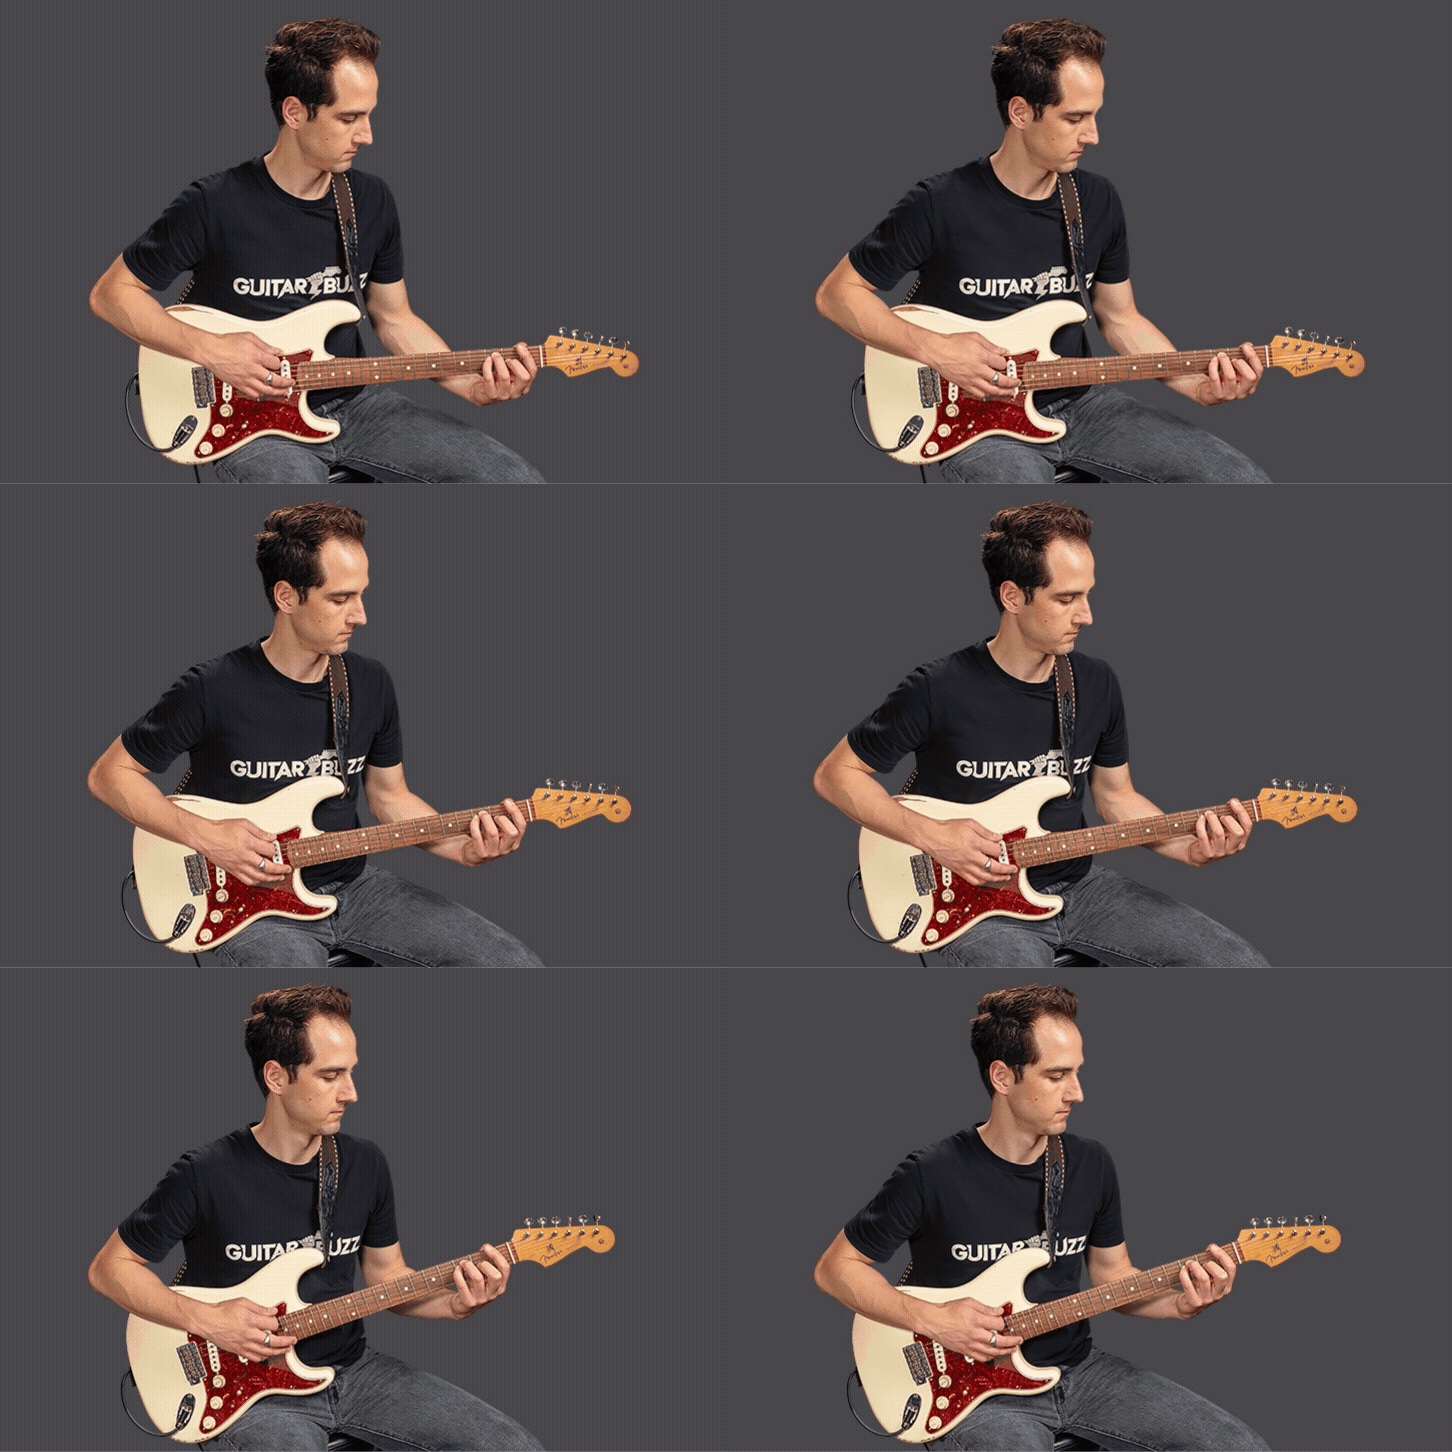
- If you’re sitting, have your guitar sit just off of your leg so that the strap is holding the weight of the guitar.
- If you wanna stand and play, sick. But all your favorite musicians wear their guitars at different places. Johnny Ramone wore his guitar almost down to his knees, while Tom Morello of Rage Against the Machine looks like his guitar might strangle him. A good place to start is to have the bottom of the body of your guitar sit at your waist line. Then you can adjust your strap depending on what feels comfortable to you.
Tip #4
Neck  Angle
Angle
Rather than having the guitar neck parallel with the floor, you want to angle it up slightly. If you start to feel discomfort in your fretting hand shoulder, it’s too high. If the neck is pointing towards the ground, it’s too low.
Mess around with this a bit to find what playing position feels best to you.
Tip #5
 Headstock Position
Push the headstock (that’s the part with the tuning pegs at the end of the neck) slightly away from your body.
Shoot for a 30-40o angle rather than holding the guitar flat against your chest. This small tilt will give your arm plenty of room to move around the neck and feel comfortable.

The crucial next step is, obviously, signing up for my complete beginner guitar course.
#4Tune Up
The most important step yet—you gotta get your guitar in tune.
 This is HUGE, because, if your guitar isn’t in tune, you’re gonna sound like you’re playing everything wrong even if you’re playing it right.
To tune your guitar, turn the tuning pegs, or tuners, which will loosen or tighten the strings. Tightening the string makes the sound higher, and loosening the string will make it sound lower.
Using a Tuner
Once you’re more experienced with guitar, you can learn to tune by ear by matching the sound of your strings to another instrument.
But for now, you should use a tuner because they’re super reliable and easy to use. Whatever you can easily get your hands on is fine—I recommend getting a clip on tuner, because they’re the most compact and easy to use. But any of these options will work:
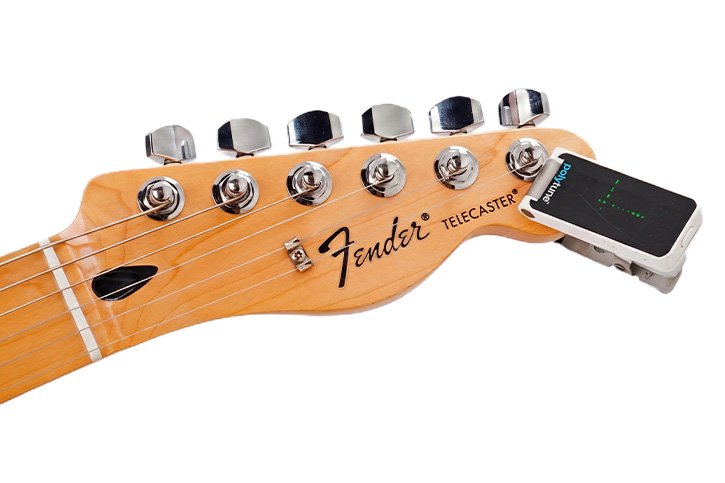
 Clip on tuner
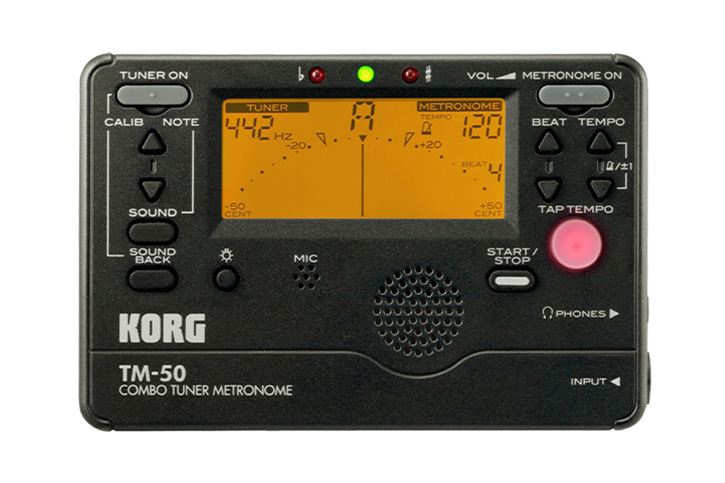
 Plug-in tuner
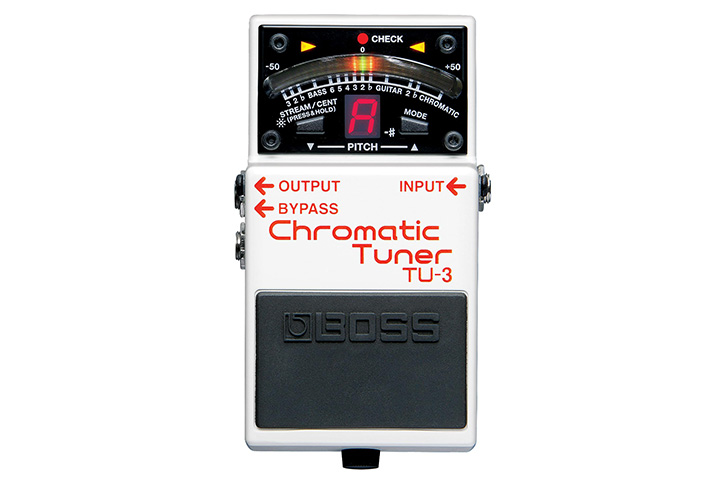
 Tuner Pedal
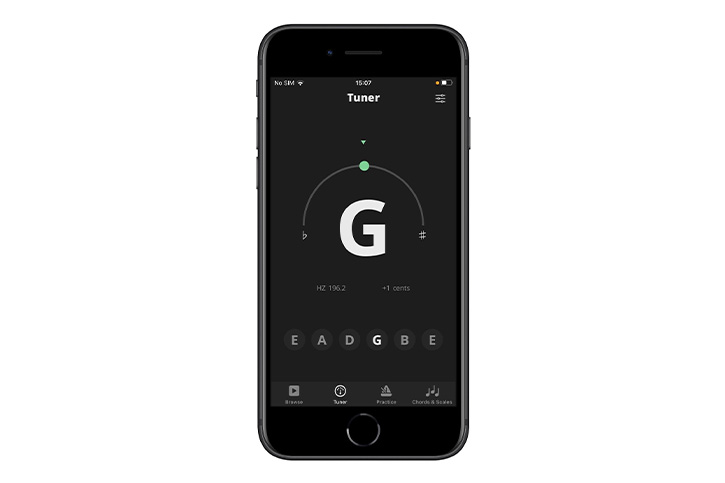
Tuning app
String Names
To use a tuner, all you need to know is the names of the strings on your guitar.
Starting from the thickest string that’s closest to your face, they are E, A, D, G, B, and E again. We call the thickest string ‘low E’ and the thinnest string ‘high E.’
To remember this, use this super cute and not at all graphic mnemonic: Eddie Ate Dynamite Good Bye Eddie.
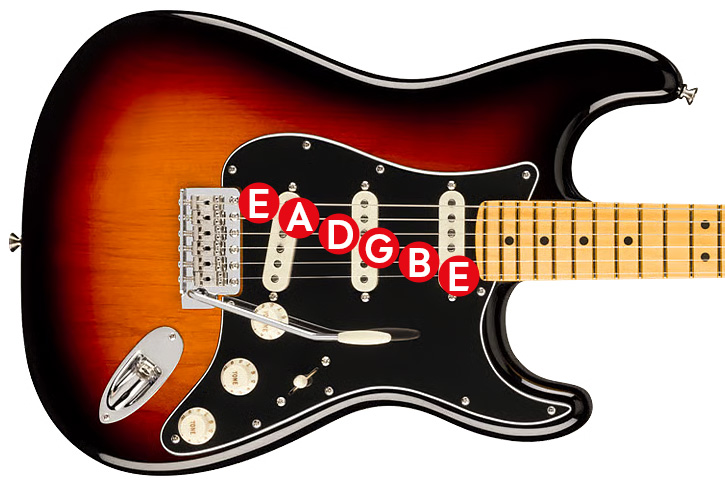
Eventually, you’ll need to learn all the other notes, but this is all you need to know for now.
And now, without further ado, let’s make some noise.
#5Pick
Pickin’ time. A guitar pick is the key to having a tight, solid tone right from the get go.
Grip the Pick
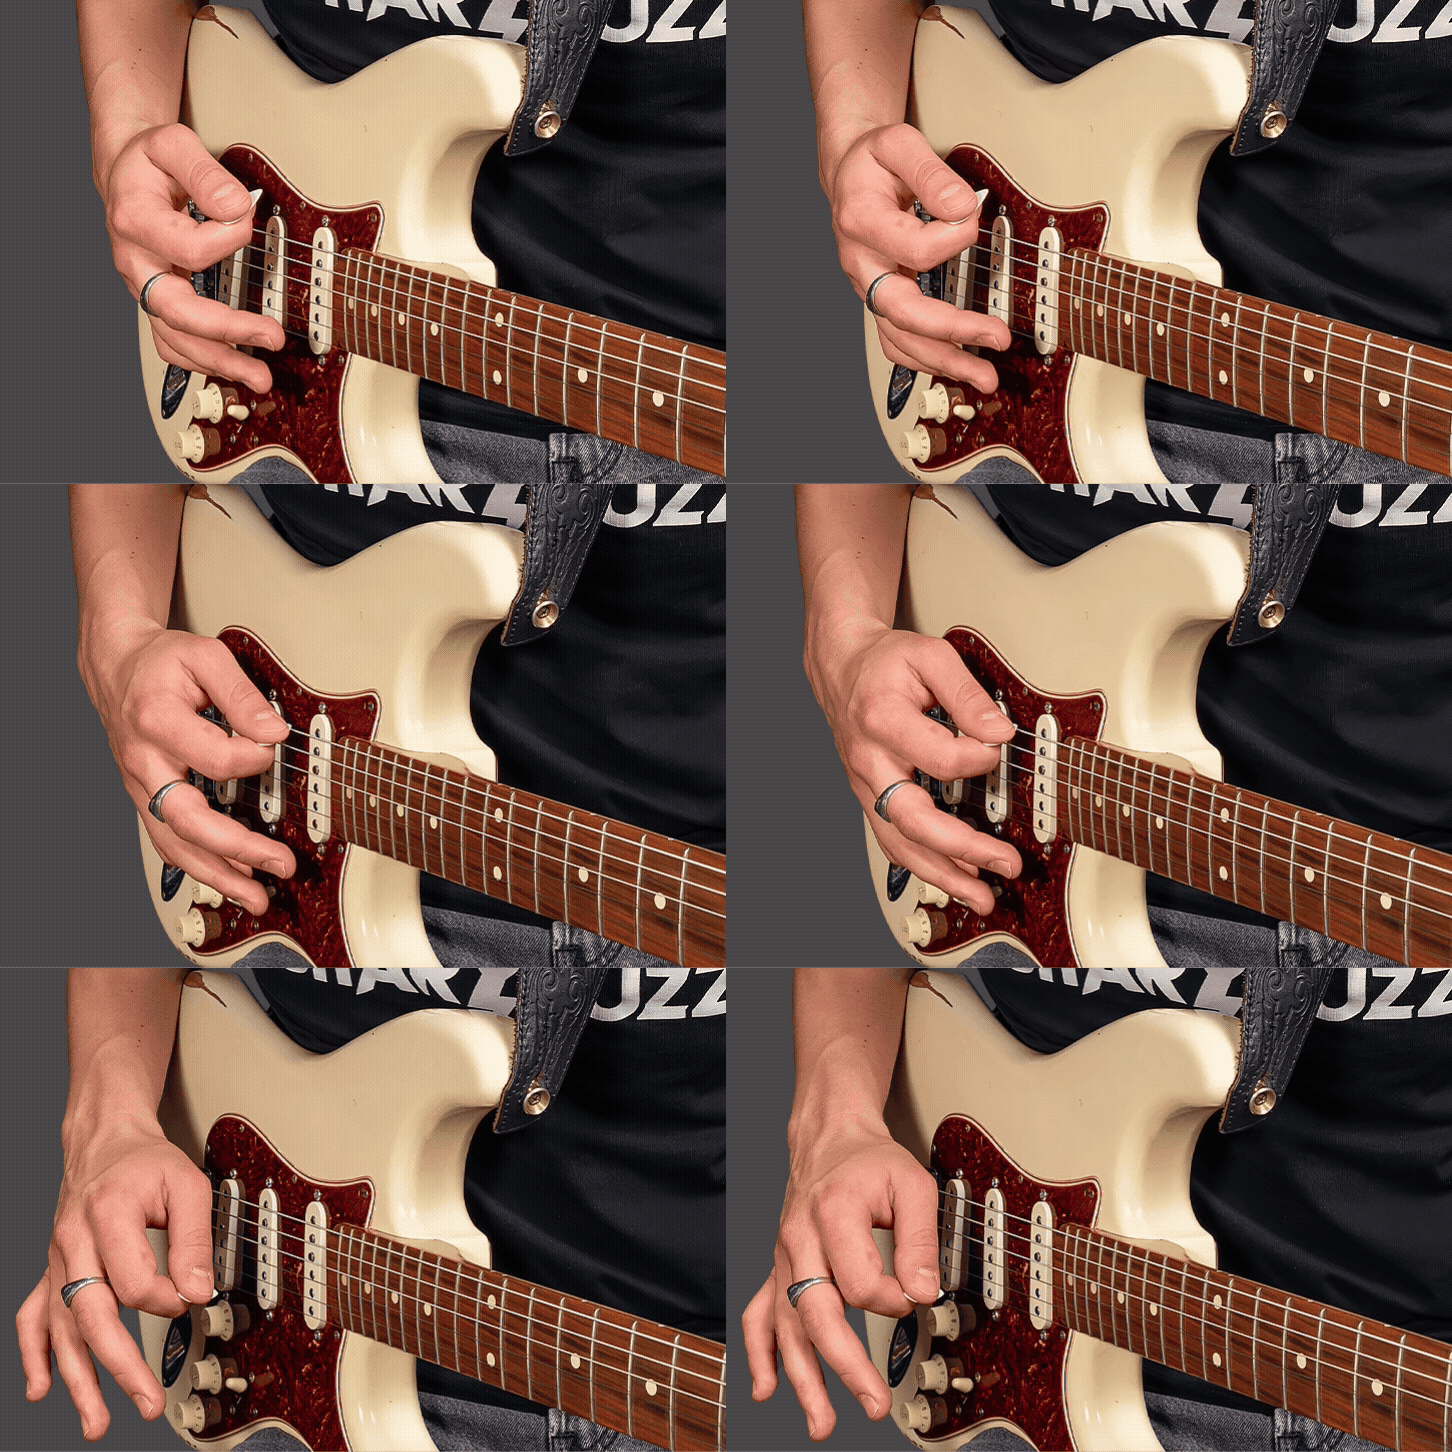
When you’re first starting, picks feel weird in your hand. And if you don’t know how to wield your new weapon of tone, it’ll go flying across the room or get stuck on the strings. To make sure that you sound rad, you gotta grip the pick the right way.
- Hold out your index finger and place your pick on the side with the tip parallel to your finger
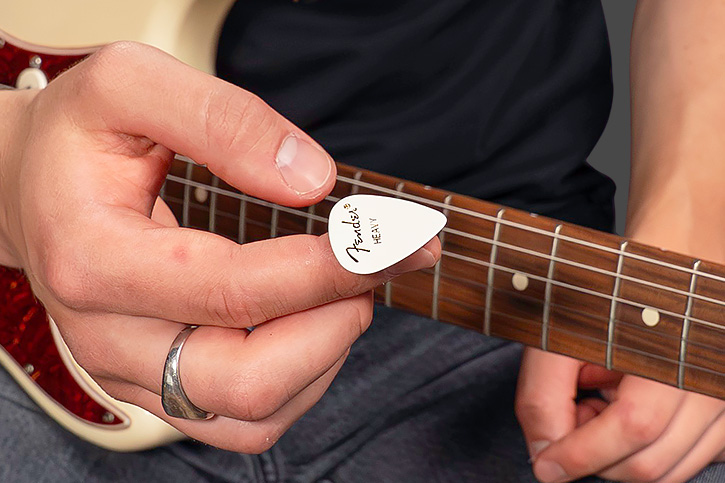
- Curl your index finger in and place the pad of your thumb perpendicular to the pick tip
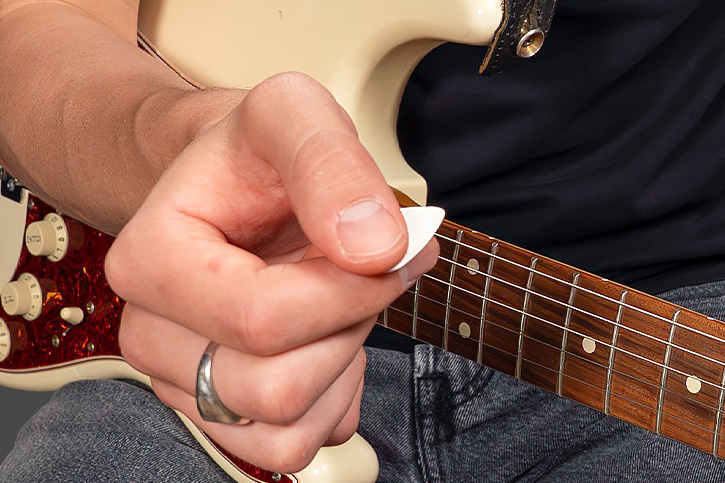
- Hold it just tight enough so that it won’t fly out of your hands
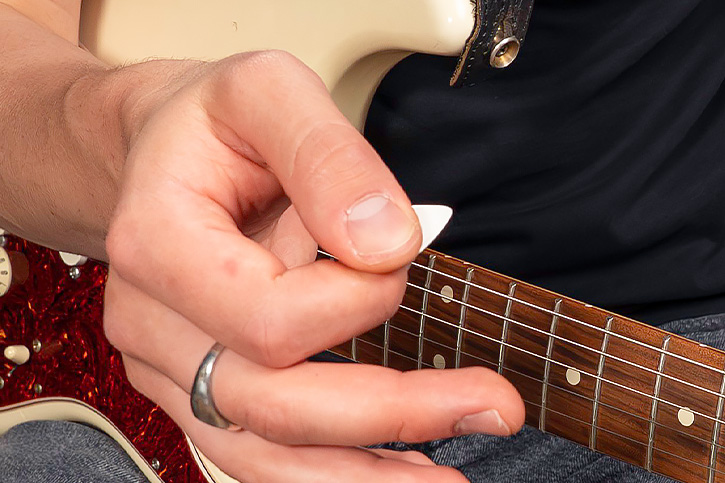
- Bring the pick up above the strings with your thumb parallel with the strings
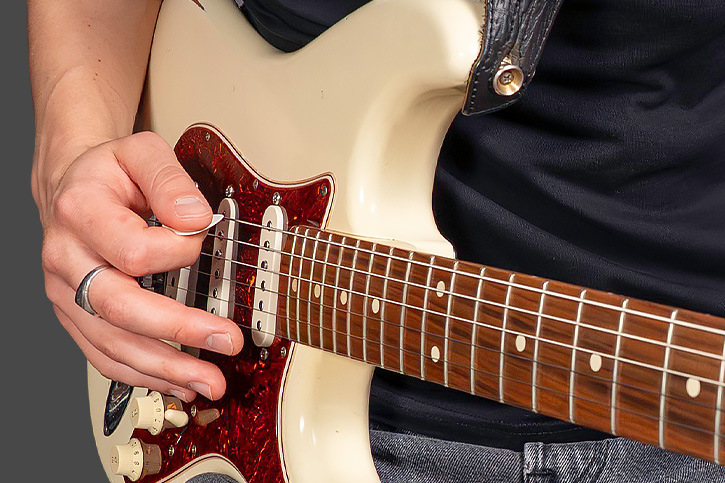
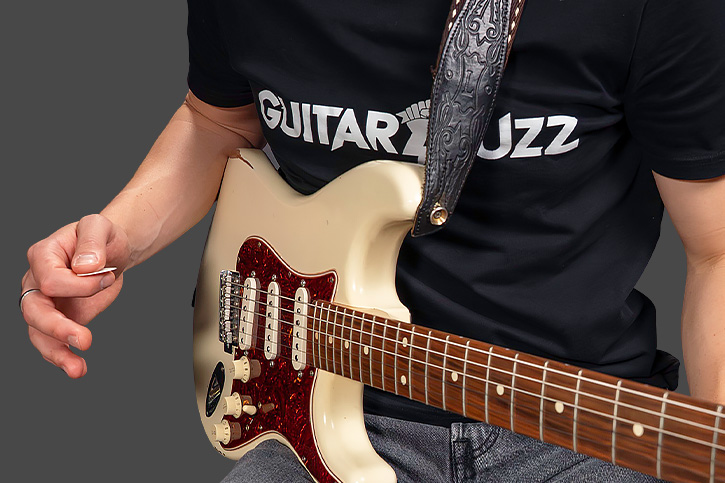
- Stabilize the guitar with your picking forearm on the upper bout of the body
Time to Pluck
Now you’re all set to play your first note.
Hold the pick just above the low E (the thickest string) and turn your wrist almost as though you’re flicking a bug off your hand. It should sound like this:
Congrats, you just played your first note.
Go ahead and try it a few more times. If your pick is getting stuck on the strings or if your notes sound really harsh, grip the pick a little looser. And if you’ve already dropped your pick, grip it a little tighter.
Once you get the happy medium pick grip, you want your pick to absorb some of the impact of the string. To do this, tilt the pick in the direction of the string a bit. It should glide over the string easily and sound smooth.
It’s pretty easy to accidentally pluck the A string, the one next to the low E, by accident. To avoid this and only pluck the string you want, make sure you’re flicking your wrist to pluck so you follow through away from the body of the guitar.
If it doesn’t sound or feel awesome, don’t worry. Remember what I said at the beginning. You’re brand new to this. You’re kinda supposed to be bad right now. With time, repetition, and patience, you’ll continue to sound better and you’ll feel a lot more comfortable. I promise.
Let’s level it up just a bit, and pluck another string. We’ll skip the A string and head to the D string.
This is a little more tricky than plucking the low E string, because you have to worry about strings on either side of the D string. Keep your movements tight, and make sure you’re turning your wrist.
Here’s a perfect first plucking exercise to practice. You’ll be plucking on the D string along with some music.
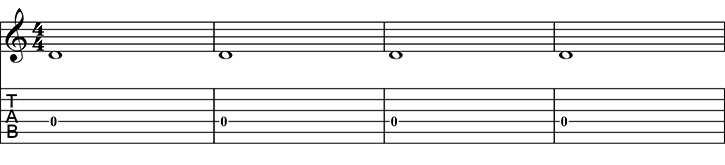
- Get ready to pluck.
- The playalong track will give you four beats. Keep counting to four, over and over again at that rhythm while you play. Or just keep it in your head.
- On beat 1, pluck the D string
- Let it ring out for beats 2, 3, and 4
- Then pluck it again on beat 1
Now that you’re a picker, let’s put your other hand to work.
#6Fret
The hand that isn’t doing the picking is your fretting hand. It does the fretting. Duh.
Fretting means using your fingers to press down on the neck to change the note you hear.
When someone says “play the second fret”, that means to press down in this space between the metal fret wires.
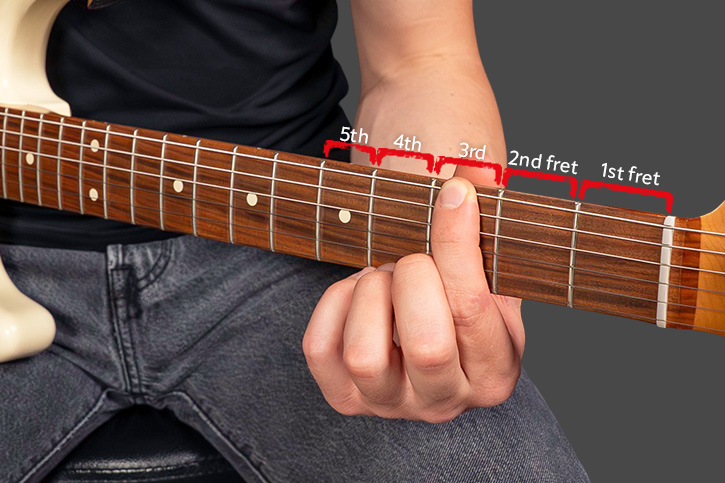
It’s pretty simple, but without good fretting technique, you’ll probably get some nasty buzzing sounds or some hand pain from trying to contort your hand. So here are three tips to get your fretting to sound great right off the bat.
Tip #1
Hand Position
Put your guitar down for a moment. Yes, this is the wax on, wax off part.
Now relax your fretting arm and lift your hand so that you’re looking at your palm.
This should feel comfortable. Your arm is relaxed at your side, your elbow is bent, your palm is facing your face, and your fingers are in a neutral position.
![Image of AL holding arm up with no guitar]](https://www.guitarbuzz.com/wp-content/uploads/2026/05/IMG-24.jpg)
Now just pick up your guitar and plop the neck right into your open fretting hand. The neck can rest in your open palm with your thumb on the back side of the neck and your fretting fingers curled in towards the strings.
Super important—remember how I said you should play with a strap whether you’re sitting or standing? This is why.
Let the palm of your hand drop a bit so the neck isn’t resting in it.
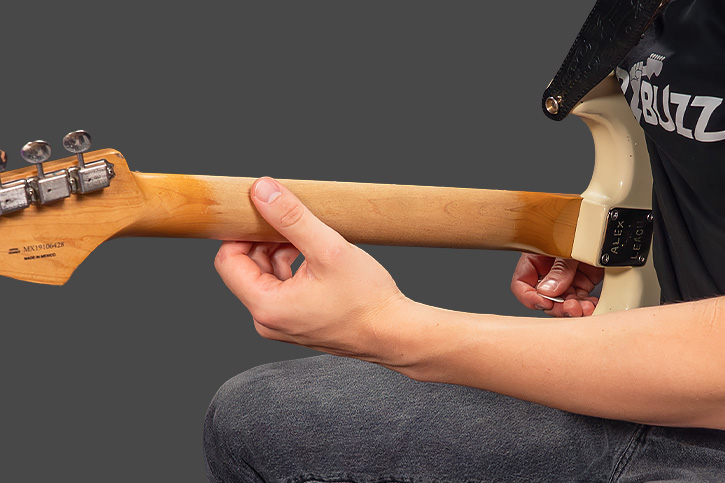
This is your starting point for killer fretting technique.
Tip #2
Thumb Position
Let’s give the thumb some love.
Your thumb is the anchor. It stabilizes your fretting hand, staying in one place so the rest of your fingers can move freely.
Imagine there’s a line going down the center of the back of the neck. Your thumb should be on or above that line.
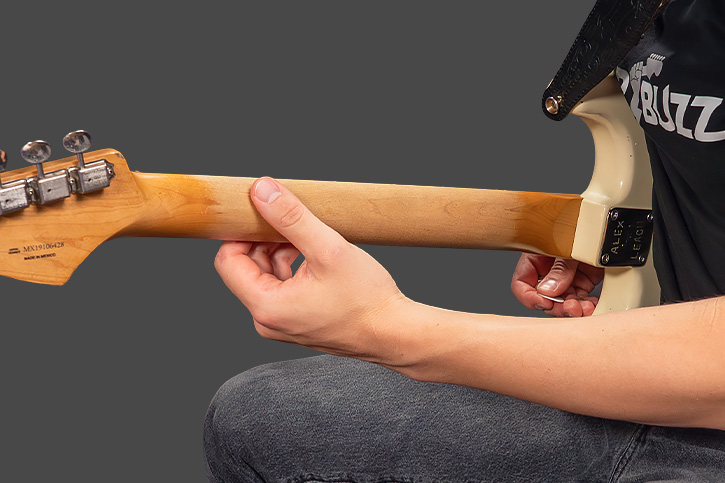
What you don’t wanna do is have your thumb above the neck or on the front of the neck. If you’re gripping the neck like a baseball bat, your hand will tense up and trying to fret different notes will feel like misery.
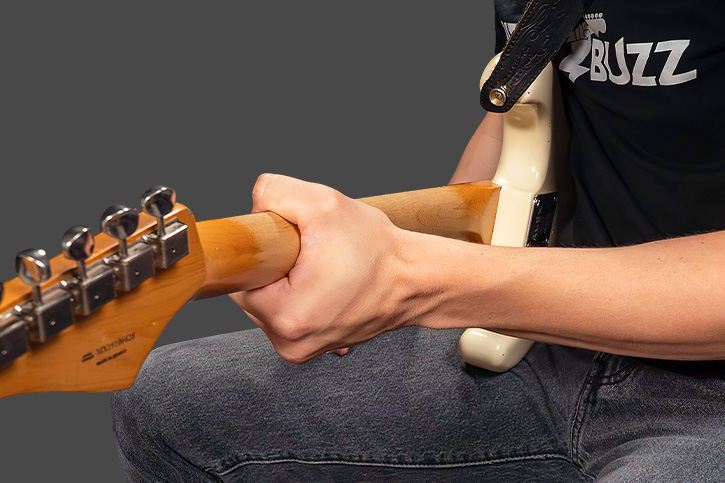
Remember how your hand looked when you held it up in front of you before grabbing your guitar? Try to replicate how your thumb was positioned, but now on the neck.
Even though your thumb is stabilizing, you need to keep super relaxed for maximum dexterity. If you press it into the neck super hard, it’s gonna slow you down.
Alright—arm, check. Thumb, check. The only thing left is the actual fretting. Let’s get to it.
Tip #3
Where and How to Fret
A ‘fret’ means the whole space between the wires, including the wire at the end closest to the body – but you don’t want to press right on the fret wire. For the cleanest, non-buzzy fretting, aim for the part of the fret closest to the body of the guitar, right “behind” the wire.
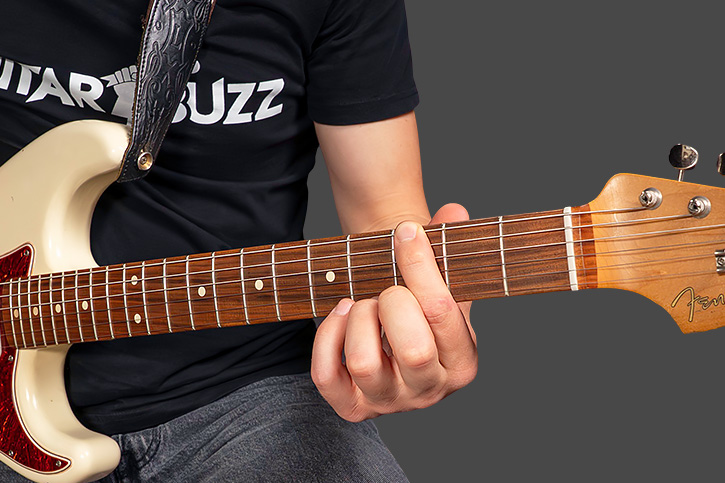
If you DO hear buzzing when fretting, it means one or more of these things might be going on:
- You’re fretting on the fret
- You’re fretting too far back (towards the headstock) in the fret space
- You’re not pressing hard enough
Time to put your new techniques to the test and play some music.
You’re gonna play two different notes, the 9th fret and the 11th fret on the D string.
![GFX of guitar neck with 9th and 11th fret of D string marked]](https://www.guitarbuzz.com/wp-content/uploads/2026/05/IMG-29.jpg)
….Remember which one that is? Eddie Ate Dynamite Good Bye Eddie. It’s the third closest string to your face.
Notice that your guitar has dots on certain frets and on the front and the side of the neck. Those are just visual markers to make it easier to see where you are on the guitar neck.
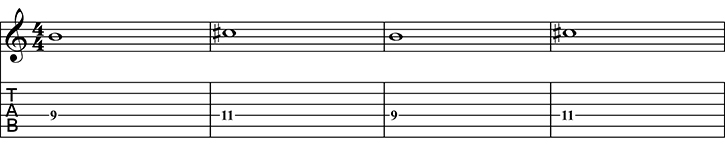
To play this, use your index finger to fret the 9th fret (it should have a fret marker) and your ring finger to fret the 11th fret (no fret marker).
Pluck the 9th fret once and hold it for four counts. Lift it up as you fret the 11th fret with your ring finger. Then let it ring for four counts too.
For this exercise, just go back and forth between those two notes. Try it with the track provided and do it a whole bunch of times.
Your finger tips might hurt a little bit or start to feel tired. This is super normal when you first start out. In a few weeks, you’ll build up some stamina, and you’ll barely even notice that pokey-feeling string under your finger.
Now that your hands are vibing and you’re sounding good, it’s time for the final step.
#7Groove With the Music
The last piece of the puzzle is feelin’ the music. I’m talkin’ ‘bout rhythm.
Plucking some fretted notes is one thing. But if you can’t do it while locked in with the song and the band, you’re gonna sound like you don’t know what you’re doing.
But good news – if you ever tap your foot or bob your head to a song, you’re already on the right track for step one – feeling the pulse.
Step 1: Feeling the Pulse
While it’s mainly the drummer’s and bassist’s job to hold down the rhythm for the song, that doesn’t mean that the guitarist is off the hook.
If you try to play without feeling the pulse you’re gonna have a hard time playing anything that sounds cool. The bassist will glare at you. The drummer might throw their sticks at you.
The first step is knowing how to listen to the drummer.
A typical drum pattern will use three pieces of the drum kit.
- Kick drum (bass drum): It’s the big one that sits on the floor by the drummer’s feet. It has a deep, thud-y sound.
- Snare drum: The one that sounds like a loud ‘CRACK.’
- Cymbals: These make a metallic ‘tsk.’ The most commonly played cymbals are the hi-hats (the two cymbals stacked on top of each other).
Most of the time, you’ll hear the cymbals all the time. They’ll play on each pulse—“1…2…3…4…1…2…3…4.”
The kick drum and the snare drum alternate. A common basic pattern is kick, then snare, then kick, then snare, on “1…2…3…4…”
Drummers play tons of variations and different patterns, but this gives you a solid idea of how to hear and feel the drummer’s pulse.
Step 2 – Play Simple Rhythms to the Pulse
Now that you’re feeling the pulse of the song, you need a few simple rhythms to play that fit into the feel of the song.
Have a listen to the drum track below. Find the pulse. That’s where you’d tap your foot or bob your head.
In musical terms, this is called the beat. When we count one, two, three, four, we’re counting beats. We name rhythms by how long we hold a note.
If you pluck a note on beat one and hold it for four beats, “pluck…2…3…4,” it’s called a whole note.
Here’s an example of whole notes on the open D string with that same drum pattern.
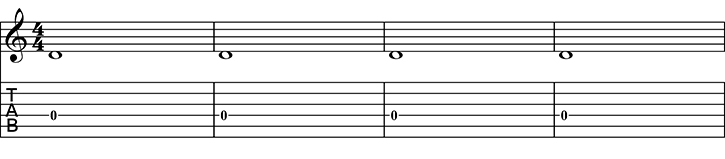
If the note only lasts two beats, it’s called a half note.
Here’s an example of some half notes on the open D string. Here I’m plucking on beat one, and holding it out for beats one and two, then plucking again on beat three, and holding it out for beats three and four.
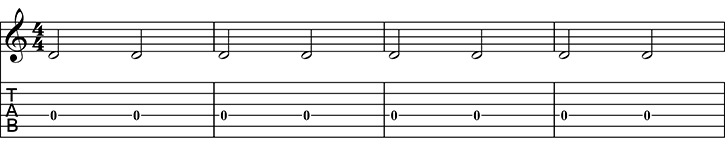
Notes that only last one beat are called quarter notes. To play quarter notes, you’d pluck on each beat, “1…2…3…4.”
This will feel faster than the first two, so focus on keeping your picking hand relaxed. If you accidentally hit some other strings, don’t worry about it. Just keep grooving.
Here’s an example of quarter notes. This time I’m fretting the 9th fret of the D string with my index finger.
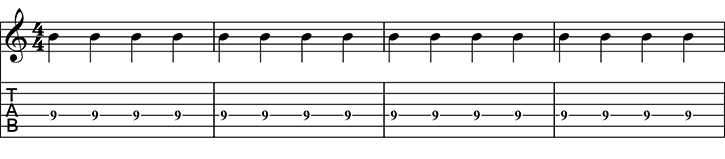
So we’re playing on every beat now, but there’s one more rhythm we’re gonna cover.
If a quarter note gets one beat, you can fit two eighth notes in that same beat. Eighth notes are just faster notes. So instead of “1…2…3…4,” you play “1-and, 2-and, 3-and, 4-and.” More notes, same time.
Since eighth notes are twice as fast as quarter notes, your picking hand has to move pretty quick to nail them.
Give it a try with this track. I’m playing the D string fretting the 11th fret with my ring finger.
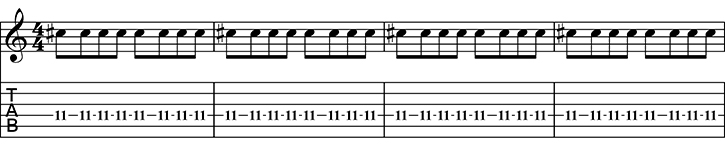
There are a bunch of different rhythms out there, and you can combine them all to make tons of rad stuff. But for today, these four rhythms are a great place to start.
Your First Riff
Okay—time to put everything you learned together and play “What Ever Happened?” by the Strokes.
I’m gonna teach you this riff in four different levels. We’ll start with the easiest, and by the fourth and final level, you’ll be playing it exactly like Albert Hammond Jr does.
All the notes you’ll play are on the D string. Remember the names of the strings? Of course you do. But for my own sake, I’m just gonna leave this here: Eddie Ate Dynamite Good Bye Eddie.
The first note of the riff is the 9th fret of the D string played with your index finger, just like you did a few minutes ago. The only other note you’ll need for this riff is the 11th fret of the D string. This one’s played with your ring finger.
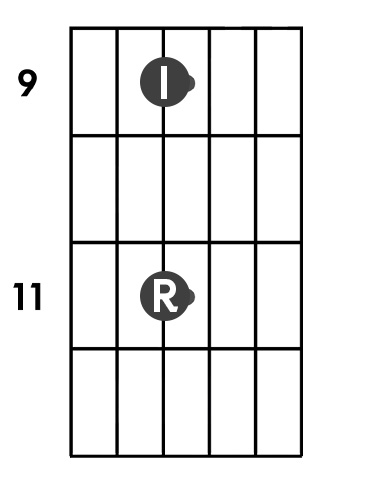
When you’re fretting, remember to relax your hand and keep your thumb on the upper half of the back of the neck. As you move from the 9th fret to the 11th fret, you can lift your index finger as you place your ring finger down. Move your hand slightly up the neck while keeping your thumb in the same position.
Once you feel comfortable moving between these two notes, you’re ready to go. Remember to listen to the drums—specifically the hi-hat, because the beat is a little squirrelly.
Now turn up your knobs, double check your tuning, and let’s hit it.
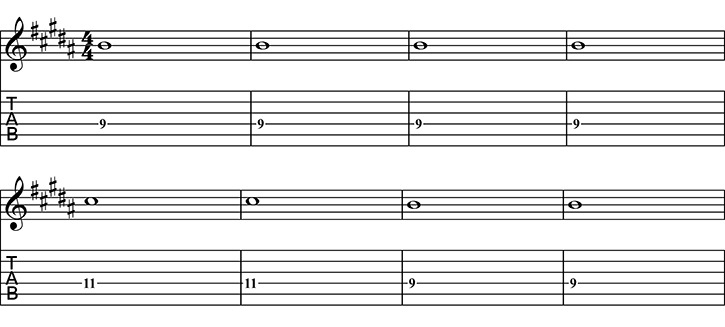
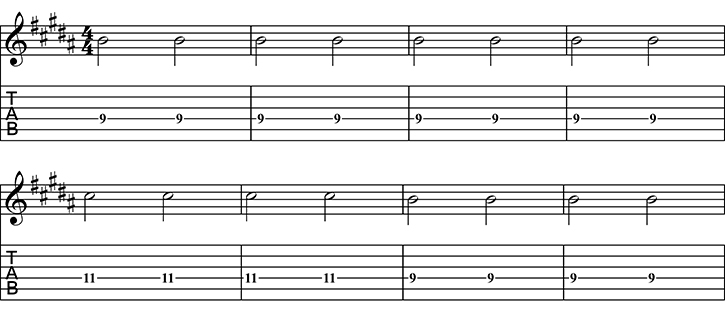
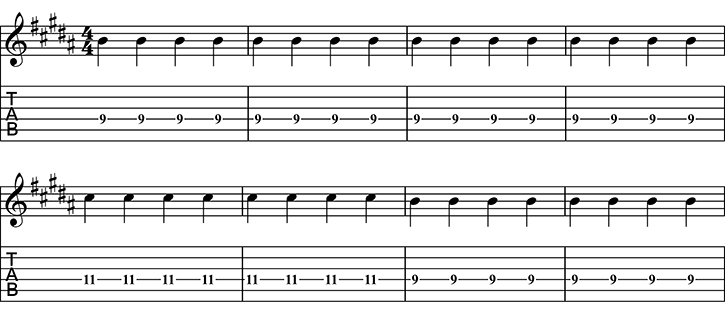
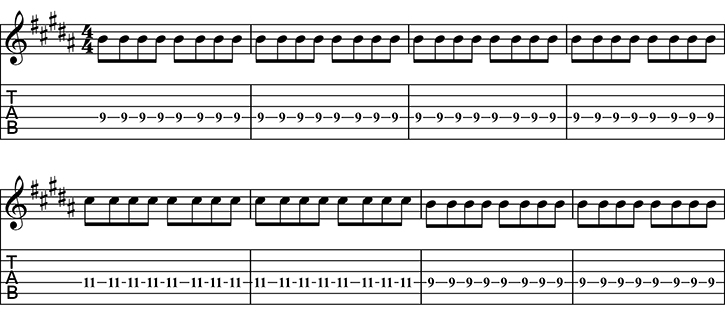
If you get to the quarter note level or the eighth note level and your picking hand starts to say “oh hell no,” then just keep jamming on the level that you feel the most comfortable playing. It’s not a race.
Level 4 – the version that Albert Hammond Jr plays on the Strokes’ recording – is all eighth notes. But he had been playing for 14 years when he recorded that part, so be patient with yourself. You have plenty of time to work your way up to playing it just like the band.
Conclusion
Big congrats on using all your newly developed guitar skills in your first real song!
When you’re done basking in the glory of your guitar-playing victory, click here to check out 25 guitar tabs that are easy to play and will help you keep developing your skills.

'%3e%3cg id='Final-Copy-2_2_' transform='translate(1275.000000, 200.000000)'%3e%3cpath class='st0' d='M7.4,12.8h6.8l3.1-11.6H7.4C4.2,1.2,1.6,3.8,1.6,7S4.2,12.8,7.4,12.8z'/%3e%3c/g%3e%3c/g%3e%3c/g%3e%3cg id='final---dec.11-2020'%3e%3cg id='_x30_208-our-toggle' transform='translate(-1275.000000, -200.000000)'%3e%3cg id='Final-Copy-2' transform='translate(1275.000000, 200.000000)'%3e%3cpath class='st1' d='M22.6,0H7.4c-3.9,0-7,3.1-7,7s3.1,7,7,7h15.2c3.9,0,7-3.1,7-7S26.4,0,22.6,0z M1.6,7c0-3.2,2.6-5.8,5.8-5.8 h9.9l-3.1,11.6H7.4C4.2,12.8,1.6,10.2,1.6,7z'/%3e%3cpath id='x' class='st2' d='M24.6,4c0.2,0.2,0.2,0.6,0,0.8l0,0L22.5,7l2.2,2.2c0.2,0.2,0.2,0.6,0,0.8c-0.2,0.2-0.6,0.2-0.8,0 l0,0l-2.2-2.2L19.5,10c-0.2,0.2-0.6,0.2-0.8,0c-0.2-0.2-0.2-0.6,0-0.8l0,0L20.8,7l-2.2-2.2c-0.2-0.2-0.2-0.6,0-0.8 c0.2-0.2,0.6-0.2,0.8,0l0,0l2.2,2.2L23.8,4C24,3.8,24.4,3.8,24.6,4z'/%3e%3cpath id='y' class='st3' d='M12.7,4.1c0.2,0.2,0.3,0.6,0.1,0.8l0,0L8.6,9.8C8.5,9.9,8.4,10,8.3,10c-0.2,0.1-0.5,0.1-0.7-0.1l0,0 L5.4,7.7c-0.2-0.2-0.2-0.6,0-0.8c0.2-0.2,0.6-0.2,0.8,0l0,0L8,8.6l3.8-4.5C12,3.9,12.4,3.9,12.7,4.1z'/%3e%3c/g%3e%3c/g%3e%3c/g%3e%3c/g%3e%3c/svg%3e) Privacy Choices
Privacy Choices
 Beginners Course
Comments
Got something to say? Post a comment below.